
For many aquarists, upgrading to a canister filter is an exciting step up from a hang-on-the-back power filter. External power filters are much smaller and have less-sophisticated filtration and flow control. They’re easier to set up and maintain but don’t have the flow rate, filter media options and accessories of a canister filter.
But like the smaller power filters, canister filters need to be assembled before use. It can be quite intimidating when you first open the box and see all the different components that have to be put together. But don’t allow yourself to be overwhelmed. We’ll take you step-by-step through the basic of setting up your canister filter.
Step 1: Read the manual
Not everyone enjoys reading product manuals. A lot us like to jump in try to figure things out on our own. This can be a difficult task with an aquarium canister filter. Depending on the model, there can be over 40 parts that need to be attached in the right place and in the proper order.
The manual will help you recognize the individual parts your going to assemble to get the canister filter up and running. The main reason for new filter problems is due to making a mistake when setting it up the first time.
Step 2: Check the parts list
It’s always a good idea to compare the parts list with what came in the box. It’s rare but an important component may be missing. Better to check and make sure your new canister filter has all the parts needed before starting to set it up.
If something is missing, you have the option of exchanging the entire filter or contacting the manufacturer for a replacement part. There’s nothing so frustrating as having your filter mostly assembled only to find an essential part is missing.
Comparing the parts list to what came in the box will also make the assembly go quicker. You’ll have an idea what the component looks like and how many you need for each step in the assembly.
Step 3: Assemble the canister
Open up the canister and examine the filter baskets. Notice how they nest together. If the baskets are arranged incorrectly, the lid won’t seat properly. This can put damaging stress on the lid clamps or cause leaks between the canister the lid.
Take note of the filtration media. Some canister filters come with a full set of media, including activated carbon, sponge filters and biological filter media. If your want to use activated carbon, ammonia-removing zeolite or other specialty media, you may have to purchase it separately before assembling the canister. The instruction booklet should tell you the proper order of stacking the filter media in the baskets. The normal order from bottom to top is:
- Filter sponges to trap debris before it clogs the other media.
- Activated carbon to remove organics, odors and discoloration
- Biological filter media to help eliminate ammonia and nitrite.
- Top filter pad or sponge
Every canister filter is slightly different. Taller canisters have more baskets, allowing for a greater variety of media. Follow the directions that came with your brand of filter. Be sure to thoroughly rinse the filter media before placing it in the filter. Rinsing removes dust and prevents it from entering your aquarium. It also flushes air bubbles out of media like activated carbon.
Step 4: Place the canister filter under your aquarium
Test-fit where you want to place the canister. If it’s going under the tank or in the cabinet, you’ll want to make sure it fits and is easy to remove for maintenance. The power cord has to reach a power outlet too.
Experiment and find the best location based on where the tank is located, and the amount of room needed for maintaining the filter.
But there’s more! Canister filters should be placed below the aquarium. That’s because the canister fills by gravity and “feeds” the pump water. Some aquarists have been able to place the canister filter next to the aquarium if they have taller tanks. But often times the siphon action is very week, starving the pump of water and causing the filter to stop working.
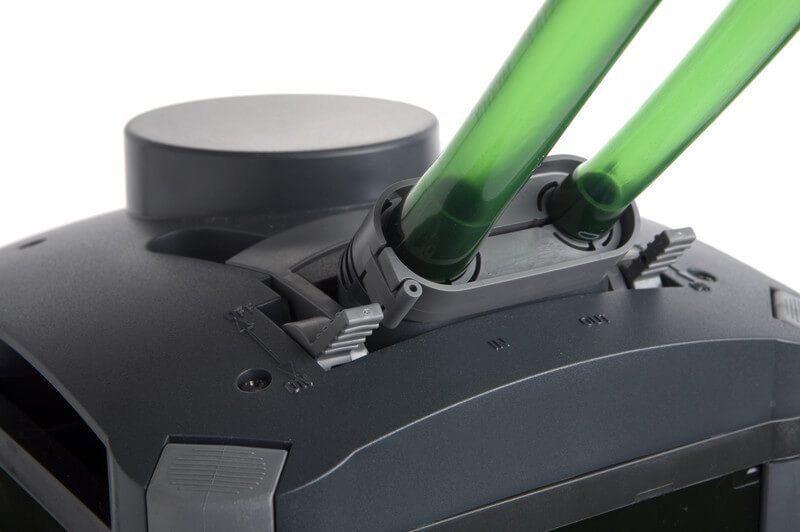
Step 5: Install the hoses
Canister filters require two hoses. One directs water into the canister filter. The other hose is used to return purified water to the aquarium. Proper installation of the hoses depends on where the canister is positioned. There needs to be room for the hoses to connect to the top of the canister filter. But you’ll also need enough room to slide the filter out of the cabinet for maintenance.
The best approach is to assemble the intake and return tubes and connect them to their respective hoses. Place the hoses on the aquarium in the position where they likely stay once the filter is set up. Next, run the hoses behind the aquarium and into the cabinet. The idea is to allow enough slack in the hoses so you can slide the canister filter out of the cabinet for maintenance.
If your filter comes with quick disconnect valves you won’t have to worry about this. The quick disconnects allow you to shut off the hoses and disconnect them from the canister without pulling the canister out of the cabinet.
The main thing to remember when deciding on the length of hose is kinking. If the hose is too long or positioned improperly it can droop and cause a kink or sharp bend. This cuts off the water supply and reduces water flow. Test fit the hoses to find out the best length for your particular aquarium set-up.
Special information about canister filter hoses
We’ve compiled several “pro tips” for working with filter hoses and tubing.
The best type of tubing is made of thick-walled silicone. The combination of thick walls and flexibility prevents kinking even in tight bends. Silicone tubing is soft compared to other plastics. This makes it easy to push barbed inlet and outlet fittings into the hoses. Silicone tubing doesn’t have a “memory.” Even though it’s coiled up in the filter box, it will roll out straight without any bends or kinks.
Some canister filters come with vinyl tubing. The thick-walled types resist kinking and have very little memory. They’ll slip easily onto inlet and outlet fittings. The cheapest budget vinyl hoses have thinner walls and aren’t very flexible. When you try to unroll the hoses, they’ll stay bent and even kinked.
But there is a way to make working with stiff hose easier. Fill the kitchen sink with warm water. Soak the hoses in the water until they soften up. You’ll be able to “massage” the bends and kinks out when the tubing gets softer due to the warm water.
Once the hoses are softer it will be easier to slide barbed fittings into the hose ends. You won’t have to wrestle with stiff hoses. They’ll easily bend and conform while positioned under your aquarium.
Step 6: Prime the canister filter
Once the canister is loaded with filter media and the hoses are installed, you’re ready to prime the filter. Most canister filters position the water pump inside the canister lid. Plugging in the filter won’t pull water into the canister. All it will do is damage the impeller.
Here’s how the typical canister filter works. The canister tank must be completely filled with water before plugging in the filter. When the pump begins to send the water back to the tank, water from the aquarium, by siphon action, refills the canister.
The return pump is pushing water up and into the aquarium. That’s why the intake hose is often larger than the return hose. The larger hose sends more water, by siphon action, to the canister ensuring the pump never runs dry. But to start this process you need to prime the filter first.
Priming means filling the canister tank with water. Many canister filters include a priming button. It’s really a small internal suction pump that starts the siphon on the intake side of the filter. A few pumps of the primer and aquarium water starts filling the canister. If your filter doesn’t have a primer, you’ll have to suck on the outlet hose to start the siphon. Once the canister is completely full of water, plug it in.
Dealing with air inside the filter
When you first start up the filter, there’s going to be some air trapped inside the canister.
Filter media like activated carbon and sponge filters will release air into the filter. The pump will probably make some whooshing noises as the air is forced out of the filter.
If the impeller makes a grinding sound, it’s because there is an air pocket inside the canister tank. The air pocket is preventing the pump from moving water and air out of the filter. Unplug the filter and wait a about 30 seconds. Plug the filter back in and the pump should run normally.
Step 7: Adjust the intake and screen
There are several common styles of intake fittings. Most canisters come with a fixed length intake tube with a filter screen on the bottom. You’ll also find some canisters come with intake extension tubes, allowing you to add to the length of the intake.
The idea is to lower the intake screen closer to the bottom of the aquarium. The logic is the lower intake will suck solid debris off the bottom of the gravel surface. Truth is, if your aquarium has visible solid waste accumulating on top of the gravel, the tank’s in big trouble. You’re over-feeding or have too many fish.
Besides, canister filters don’t have the suction power to sweep water and debris off the bottom of the tank. So, the choice is up to you how low you want to go with the intake.
Most aquarists choose to place the intake lower in the aquarium. It helps to hide the intake screen. The intake screen is important because it prevents fish from being sucked into the filter system. Snails are notorious for finding they way into canister filters. Their hard shell will jam the pump’s impeller and stop the pump. Always use the intake screen!
Step 8: Adjust the filter return tube
The return outlet may be a simple nozzle that sends water back into the aquarium. More advanced returns allow you to adjust the direction of the flow to left and right and even up or down. You’ll have the option of sending the water deeper into the tank or across the surface for wave action.
A spray bay provides a gentle water flow and agitates the surface of the water. Surface agitation increases the oxygen content of the aquarium water. Some aquarists like the sound of spraying water while others choose to use the quieter nozzle option.
Tips for a leak-free canister filter
The most common complaint about canister filters is related to leaks where the lid and canister tank meet. The lid uses a rubber O-ring to form a seal between the lid and the canister.
There are several seal designs depending on the brand of canister filter. O-rings can be round or stretch to fit onto a square motor. Some filters have the O-ring seated into a groove on the lid.
Before assembling your filter, take a close look at the O-ring to see how it is supposed to fit onto the canister and lid. If the O-ring is not positioned correctly, it won’t seal properly. If the O-ring gets twisted or wedged when the lid is pressed onto the canister, you may see drips or even a stream of water shooting out of the seal. Immediately shut off the valves or quick-release, and re-seat the O-ring.
When you cut the hoses, make sure the cut is smooth with no jagged edges. The cut ends of the hose should be “square” and not on an angle. That’s because you want the hose to have an even “grip” all the way around the hose barb.
Some canister filters use locking compression fittings on the canister and on shut-off valves. The compression nuts tighten on the hoses for a good seal. If the hose ends are not cut squarely, the compression nut wont’ make a good seal. This can cause drips or the hose to accidentally pull off of the canister.
Your canister filter may come with plastic hose clamps. This type of clamp is designed to secure a hose on a barbed fitting. They’re often used on the intake and return outlets. Hose clamps are also used to secure hoses on the canister itself. This type of clamp only requires hand-pressure to tighten it around the hose and barb. It’s not necessary to use a wrench. You’ll likely over-tighten or snap the plastic clamp.
Quieting a noisy canister filter
One of the issues some canister filter owners have is noise. Sometimes, when the canister filter is inside the aquarium cabinet, an audible hum can be heard. This is caused by the natural vibration of the filter’s electrical pump motor.
Normally it’s inaudible but inside a hard, wooden cabinet the sound gets amplified. Its as if the cabinet is like a speaker box, making the small noise much louder. The way to eliminate or reduce this vibration is to isolate the base of the canister from the hard cabinet. Pieces of corrugated cardboard placed under the canister will dissipate vibrations and quiet the filter.
Closing Thoughts
Once you get to know your canister filter, you’ll find the set-up and maintenance quite easy. The key for success is to take your time when assembling and setting up your new filter system. The benefits of better filtration, cleaner water and water circulation are worth it!
If you have any questions or comments, leave them below.
NavigationStep 1: Read the manualStep 2: Check the parts listStep 3: Assemble the canisterStep 4: Place the canister filter under your aquariumStep 5: Install the hosesSpecial information about canister filter hosesStep 6: Prime the canister filterDealing with air inside the filterStep 7: Adjust the intake and screenStep 8: Adjust the filter return tubeTips for a leak-free canister filterQuieting a noisy canister filterClosing Thoughts